Spring Security OAuth整合JWT/Redis
看标题是不是有点奇怪,其实是这样的,一开始是想着做一个Spring Boot和OAuth2的授权模块,然后看了下觉得可以把Redis搞进去,存取Token性能好点。后来又发现JWT这个神奇的东西,心生邪念,要不再加进去?OAuth2+Redis+JWT岂不是叼炸天?然后一顿操作,发现还是不要瞎搞的好,理解每个事物存在的意义,再来决定怎么使用,不然可能到头来全是给自己添烦恼。(好吧BB半天其实就是踩坑了)。
那下面就分享下学(cai)习(keng)的过程吧。
References:
- https://gitee.com/log4j/pig 基本上想到的这里都有,很强大的一个项目,本文的很多代码都参考了此项目,感谢
- https://projects.spring.io/spring-security-oauth/docs/oauth2.html 官方文档,目前很不完整
- https://tools.ietf.org/html/rfc6749 OAuth2 RFC文档
- https://oauth.net/2/grant-types/ OAuth2授权模式简介
- https://alexbilbie.com/guide-to-oauth-2-grants/ OAuth2授权模式选择
- https://www.javacodegeeks.com/2017/06/oauth2-jwt-open-id-connect-confusing-things.html
- https://auth0.com/docs/api-auth/which-oauth-flow-to-use#is-the-client-absolutely-trusted-with-user-credentials-
- https://backstage.forgerock.com/knowledge/kb/article/a45882528 curl命令请求OAuth2 Token
- https://stackoverflow.com/questions/3044315/how-to-set-the-authorization-header-using-curl
- https://juejin.im/post/5a580e726fb9a01caf3757a1 OAuth整合参考
- http://www.spring4all.com/article/449
- https://www.jianshu.com/p/13a480ff46e0
- https://juejin.im/post/5c1398e5f265da6134384aee Jedis配置
- https://www.cnblogs.com/rwxwsblog/p/5846752.html
- https://blog.marcosbarbero.com/centralized-authorization-jwt-spring-boot2/ OAuth2 + JWT整合参考,JWT部分大部分参考此
- https://www.baeldung.com/spring-security-oauth-jwt
- https://www.jianshu.com/p/29b12ccbc215
- https://www.kancloud.cn/kongqq/microservice/697250
- https://www.jianshu.com/p/766cf742e3e8
- https://www.cnblogs.com/guolianyu/p/9872661.html JWT使用RSA
- http://www.marcoder.com/2017/12/11/jwt-rsa/
- https://blog.freessl.cn/ssl-cert-format-introduce/ 证书格式普及
- https://docs.oracle.com/cd/E19830-01/819-4712/ablra/index.html keytool使用
- https://learning.getpostman.com/docs/postman/sending_api_requests/authorization/ postman发送OAuth2请求
- https://github.com/postmanlabs/postman-app-support/issues/2296 postman关于body中的client_secret
好吧,这应该是我有史以来参考文章最多的一次了。以上列出的只是一部分,踩了无数坑,泪目。那下面慢慢看吧。
首先是OAuth2,相信你已经看过相关的文章了。不知道的上面有RFC文档链接,这里就聊聊坑好了。
先明确下OAuth2中几个角色的含义:
- resource owner: 资源所有者,一般来说是用户自己
- resource server: 资源服务器,存放着受保护的资源
- authorization server: 授权服务器,发放access token
- client: 一般就是需要访问resource server上资源的应用代码(可能是服务器上的webapp或者手机app或者Javascript app)。
- user agent: 浏览器或者手机app
其中authorization server和resource server可以在相同的应用中,也可以分开。
首先是授权模式的选择,一般有4种:Authorization Code,Implicit,Password,Client Credentials。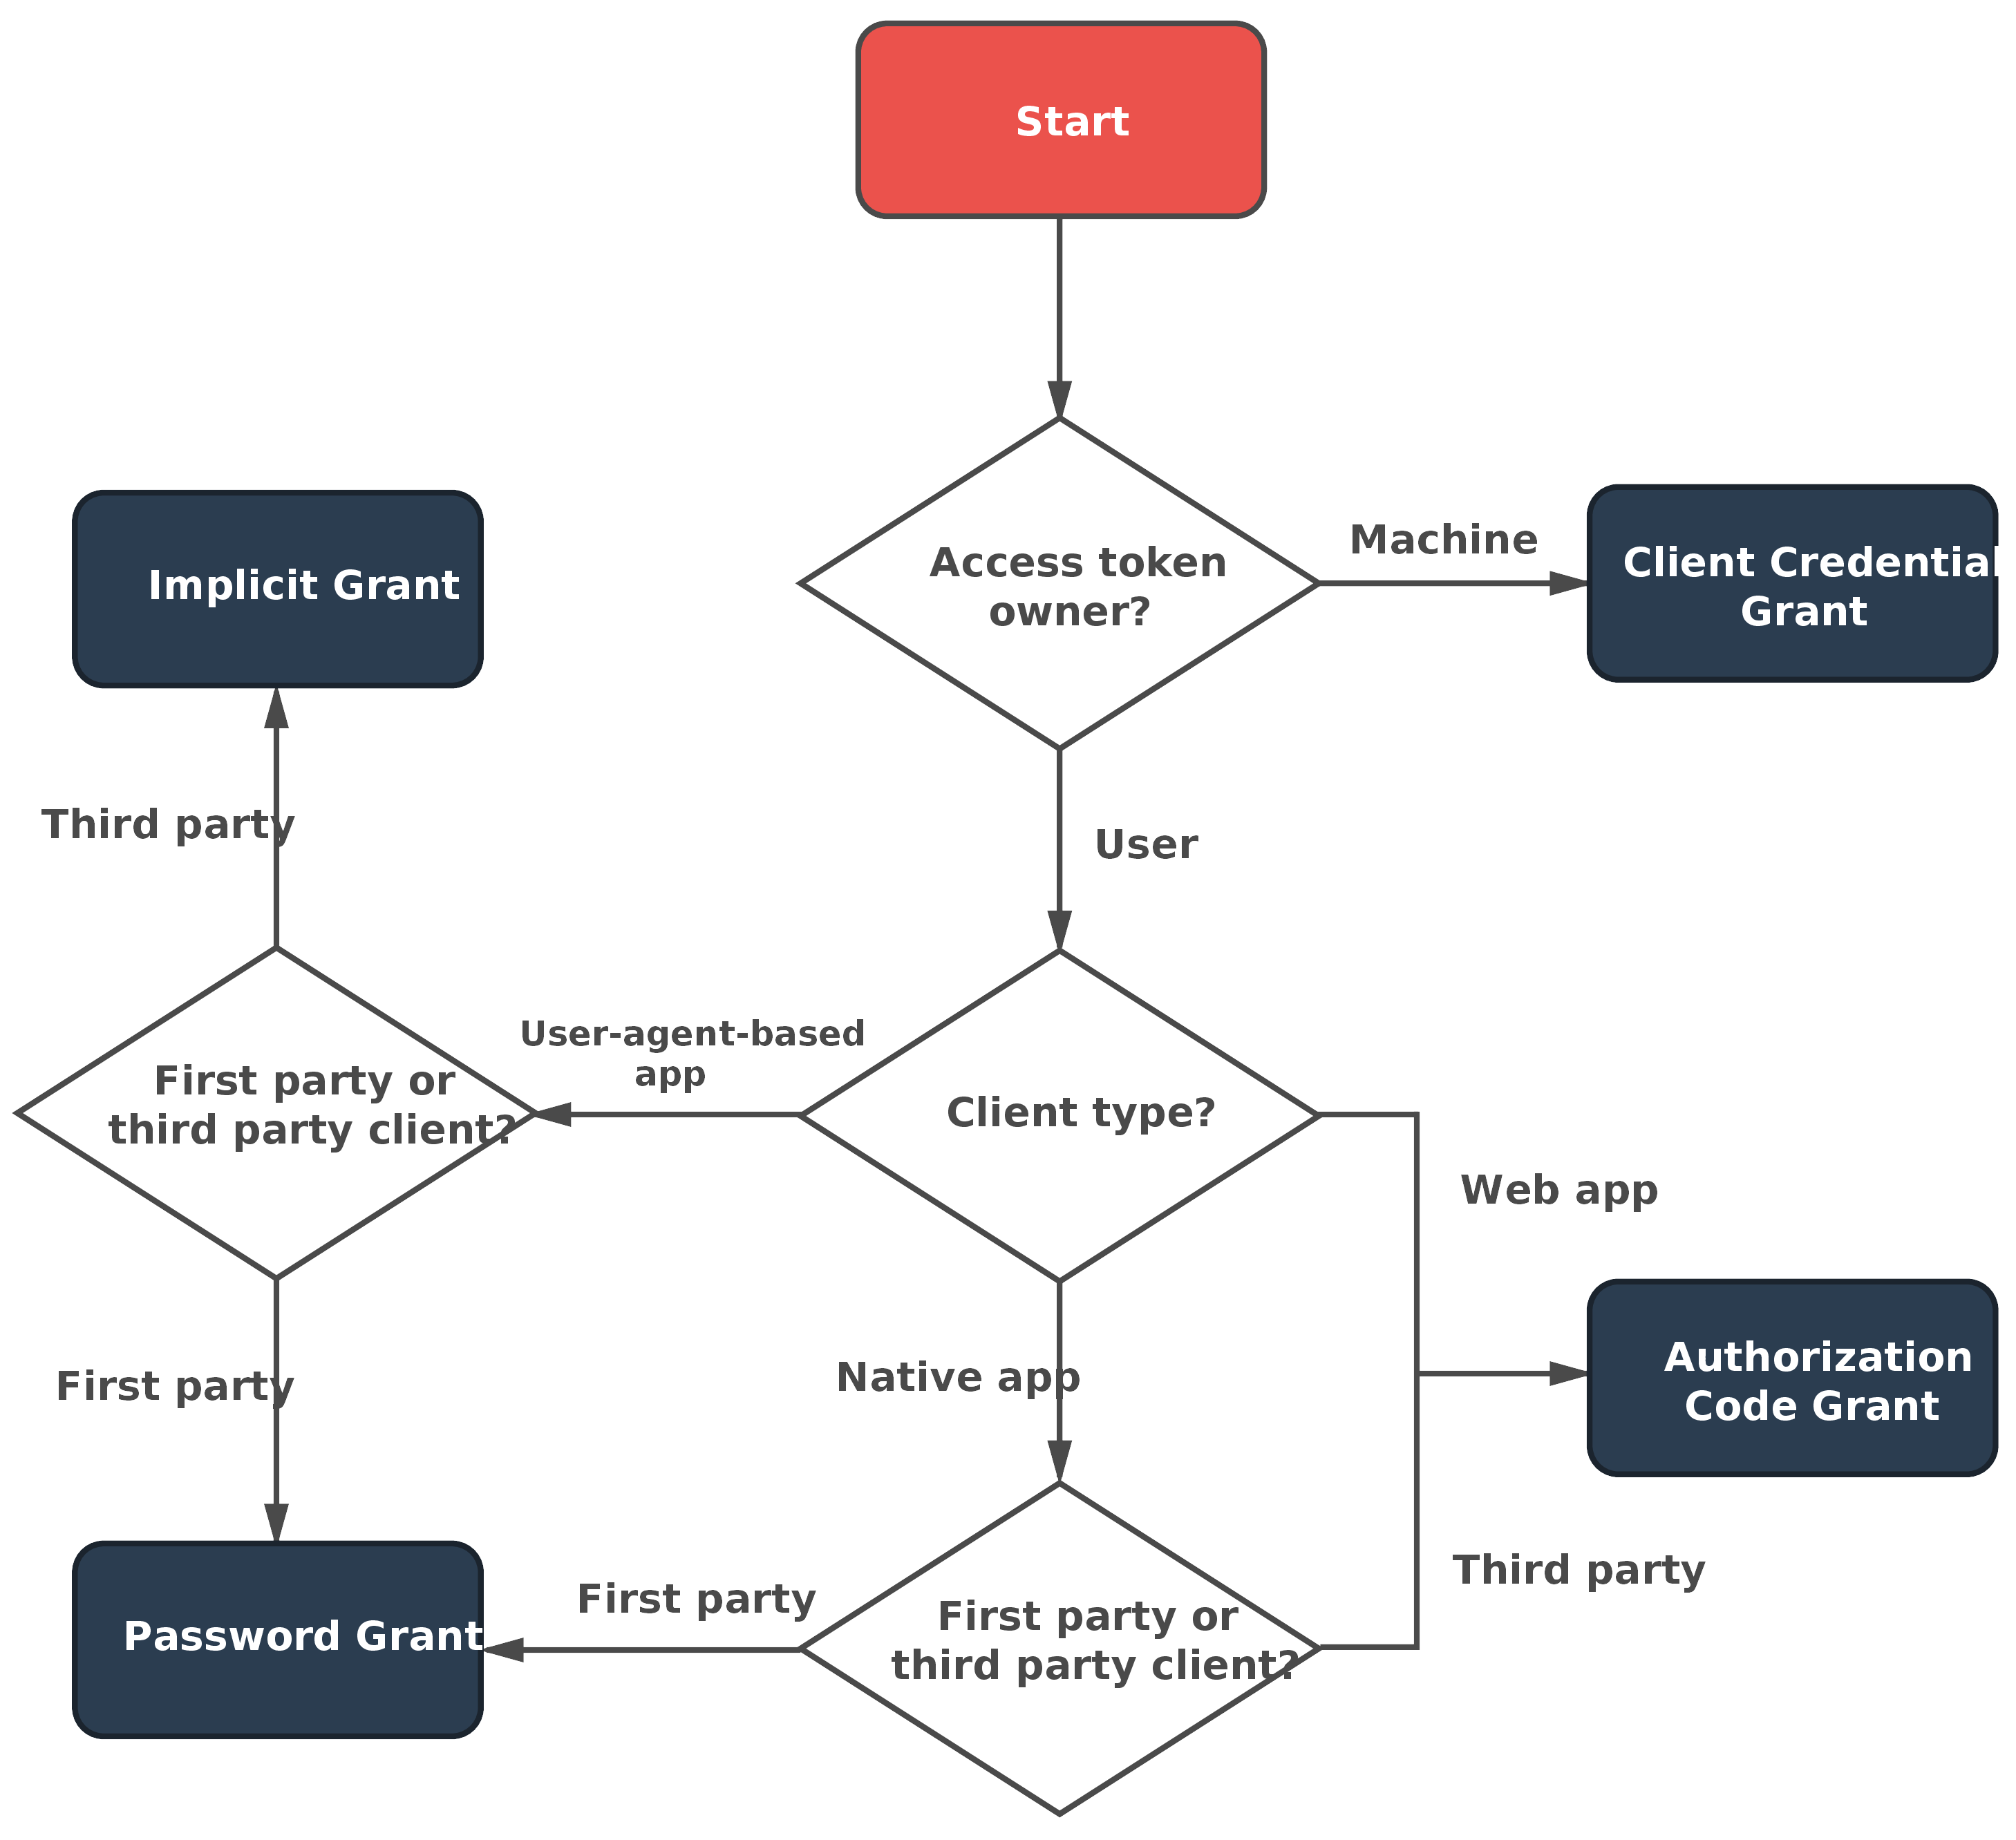
这张图很好的展示了各种模式在什么情况下使用。首先是Access token owner是否是机器,即机器和机器之间的授权,比如cron任务这种没有人参与的,就选Client Credentials。然后是Client type类型,client能否保存secret决定了应该使用哪种授权。如果client是一个完全的前端应用(例如SPA),那么对于first party clients应该使用Password(这种情况应该是最多的),对于third party clients应该使用Implicit。如果client是一个web应用有服务端组件,那应该使用Authorization Code。如果client是native app,那么first party clients还是Password,third party clients使用Authorization Code。所以这么来看first party一般用password,third party一般用code。
那这里会先后把code和password的折腾过程都说一下,另外两种不常用,就不管了。
那先来看下最复杂流程也最完整的code方式吧,Token存Redis。根据RFC文档,我们要搭建OAuth2服务器至少要有Authorization Server和Resource Server。那少废话,看下相关代码吧:
pom文件,这里只贴一些关键的,常用的相信你知道应该有什么:
<!-- redis -->
<dependency>
    <groupId>org.springframework.boot</groupId>
    <artifactId>spring-boot-starter-data-redis</artifactId>
    <exclusions>
        <!-- 不依赖Redis的异步客户端lettuce -->
        <exclusion>
            <groupId>io.lettuce</groupId>
            <artifactId>lettuce-core</artifactId>
        </exclusion>
    </exclusions>
</dependency>
<dependency>
    <groupId>redis.clients</groupId>
    <artifactId>jedis</artifactId>
</dependency>
<dependency>
    <!-- help IDE show you content assist/auto-completion -->
    <groupId>org.springframework.boot</groupId>
    <artifactId>spring-boot-configuration-processor</artifactId>
    <optional>true</optional>
</dependency>

<!-- cloud -->
<dependency>
    <groupId>org.springframework.cloud</groupId>
    <artifactId>spring-cloud-starter-oauth2</artifactId>
</dependency>
yml配置也很简单:
server:
  port: 8888

spring:
  application:
    name: auth
  redis:
    host: 127.0.0.1
    port: 6379
    password:
    database: 0
    jedis:
      pool:
        max-active: 8
        max-idle: 8
        max-wait: -1
        min-idle: 0
Authorization Server配置:
/**
 * OAuth2授权服务器配置
 */
@Configuration
@EnableAuthorizationServer
public class OAuth2AuthorizationServerConfig extends AuthorizationServerConfigurerAdapter {
    private final AuthenticationManager authenticationManager;
    private final TokenStore tokenStore;

    @Autowired
    public OAuth2AuthorizationServerConfig(AuthenticationManager authenticationManager, TokenStore tokenStore) {
        super();
        this.authenticationManager = authenticationManager;
        this.tokenStore = tokenStore;
    }

    @Override
    public void configure(AuthorizationServerSecurityConfigurer security) throws Exception {
        // @formatter:off
        security
            .allowFormAuthenticationForClients() // 允许表单登录
            .tokenKeyAccess("permitAll()")
            .checkTokenAccess("permitAll()");
        // @formatter:on
    }

    @Override
    public void configure(ClientDetailsServiceConfigurer clients) throws Exception {
        // @formatter:off
        clients
            // 客户端信息存储在内存中
            .inMemory()
            // client id
            .withClient("client")
            // grant types,这里直接开2中模式,方便测试切换
            .authorizedGrantTypes("password", "authorization_code", "refresh_token")
            // grant scopes
            .scopes("user_info")
            // client secret
            .secret("{noop}secret")
            // redirect uri,code模式才需要设置
            .redirectUris("https://www.racecoder.com")
            // token有效时间
            .accessTokenValiditySeconds(60 * 2);
        // @formatter:on
    }

    @Override
    public void configure(AuthorizationServerEndpointsConfigurer endpoints) throws Exception {
        // @formatter:off
        endpoints
            .allowedTokenEndpointRequestMethods(HttpMethod.GET, HttpMethod.POST)
            .tokenStore(tokenStore)
            .reuseRefreshTokens(false)
            .authenticationManager(authenticationManager);
        // @formatter:on
    }
}
Resource Server:
/**
 * OAuth2资源服务器配置
 */
@Configuration
@EnableResourceServer
public class OAuth2ResourceServerConfig extends ResourceServerConfigurerAdapter {
    private final TokenStore tokenStore;

    @Autowired
    public OAuth2ResourceServerConfig(TokenStore tokenStore) {
        super();
        this.tokenStore = tokenStore;
    }

    @Override
    public void configure(ResourceServerSecurityConfigurer resources) {
        resources.tokenStore(tokenStore);
    }

    /*
    @Override
    public void configure(HttpSecurity http) throws Exception {
        // 和WebSecurityConfig中的HttpSecurity相同,因此此处不用配置了
    }
    */
}
然后是Spring Security的配置,配置Web请求的拦截:
@Configuration
@EnableWebSecurity
@EnableGlobalMethodSecurity(prePostEnabled = true) // 开启spring security注解
public class SecurityConfig extends WebSecurityConfigurerAdapter {
    @Override
    protected void configure(AuthenticationManagerBuilder auth) throws Exception {
        auth.inMemoryAuthentication()
            .withUser("root")
            .password("{noop}123456") // passwordEncoder.encode("123456")
            .roles("ADMIN");
    }

    /**
     * spring security不做拦截处理的请求,忽略静态文件
     */
    @Override
    public void configure(WebSecurity web) throws Exception {
        // @formatter:off
        web.ignoring().antMatchers(
                "/favicon.ico", // 浏览器tab页图标
                "/static/**",
                "/images/**",
                "/resources/**",
                "/oauth/uncache_approvals",
                "/oauth/cache_approvals"
                );
        // @formatter:on
    }

    @Override
    protected void configure(HttpSecurity http) throws Exception {
        // @formatter:off
        http
            .csrf().disable()
            .sessionManagement()
                .sessionCreationPolicy(SessionCreationPolicy.STATELESS)
                .and()
            .authorizeRequests()
                .antMatchers("/login**").permitAll()
                .antMatchers("/oauth/authorize").permitAll()
                .antMatchers("/oauth/**").authenticated()
                .anyRequest().authenticated()
                .and()
            .httpBasic();
        // @formatter:on
    }

    @Bean
    @Override
    public AuthenticationManager authenticationManager() throws Exception {
        return super.authenticationManager();
    }

    @Bean
    public PasswordEncoder passwordEncoder() {
        return PasswordEncoderFactories.createDelegatingPasswordEncoder();
    }
}
token存Redis:
@Configuration
public class TokenConfig {
    @Bean
    @Autowired
    public TokenStore tokenStore(RedisConnectionFactory redisConnectionFactory) {
        // Redis存 token一是性能比较好,二是自动过期的机制,符合token的特性
        return new RedisTokenStore(redisConnectionFactory);
    }
}
Redis配置:
@Configuration
public class RedisConfig {
    @Value("${spring.redis.host}")
    private String host;
    @Value("${spring.redis.port}")
    private Integer port;
    @Value("${spring.redis.password}")
    private String password;
    @Value("${spring.redis.database}")
    private Integer database;

    @Value("${spring.redis.jedis.pool.max-active:8}")
    private Integer maxActive;
    @Value("${spring.redis.jedis.pool.max-idle:8}")
    private Integer maxIdle;
    @Value("${spring.redis.jedis.pool.max-wait:-1}")
    private Long maxWait;
    @Value("${spring.redis.jedis.pool.min-idle:0}")
    private Integer minIdle;

    @Bean
    @Autowired
    public RedisConnectionFactory jedisConnectionFactory(RedisStandaloneConfiguration standaloneConfig, JedisClientConfiguration clientConfig) {
        return new JedisConnectionFactory(standaloneConfig, clientConfig);
    }

    @Bean(name = "redisTemplate")
    @Autowired
    public RedisTemplate<String, Object> redisTemplate(RedisConnectionFactory redisConnectionFactory) {
        RedisTemplate<String, Object> redisTemplate = new RedisTemplate<>();

        // 设置字符串序列化器
        RedisSerializer<String> stringSerializer = redisTemplate.getStringSerializer();
        GenericJackson2JsonRedisSerializer jackson2JsonSerializer = new GenericJackson2JsonRedisSerializer();

        redisTemplate.setKeySerializer(stringSerializer);
        redisTemplate.setValueSerializer(jackson2JsonSerializer);
        redisTemplate.setHashKeySerializer(stringSerializer);
        redisTemplate.setHashValueSerializer(jackson2JsonSerializer);

        redisTemplate.setConnectionFactory(redisConnectionFactory);

        return redisTemplate;
    }

    /**
     * jedis配置连接池
     */
    @Bean
    @Autowired
    public JedisClientConfiguration clientConfig(JedisPoolConfig poolConfig) {
        JedisClientConfigurationBuilder builder = JedisClientConfiguration.builder();
        return builder.usePooling().poolConfig(poolConfig).build();
    }

    /**
     * jedis连接池设置
     */
    @Bean
    public JedisPoolConfig jedisPoolConfig() {
        JedisPoolConfig jedisPoolConfig = new JedisPoolConfig();
        jedisPoolConfig.setMaxIdle(maxIdle);
        jedisPoolConfig.setMaxWaitMillis(maxWait);
        jedisPoolConfig.setMaxTotal(maxActive);
        jedisPoolConfig.setMinIdle(minIdle);
        return jedisPoolConfig;
    }

    /**
     * redis服务器配置
     */
    @Bean
    public RedisStandaloneConfiguration standaloneConfig() {
        RedisStandaloneConfiguration config = new RedisStandaloneConfiguration();
        config.setHostName(host);
        config.setPort(port);
        config.setDatabase(database);
        config.setPassword(RedisPassword.of(password));
        return config;
    }
}
设置基本就这些,测试呢一开始用的postman,发现有点问题,所以先用curl命令的方式测,等会再说postman。code方式授权首先要获取code,然后再换token,再用token取请求资源。以上述为例,直接用浏览器完成code的获取:
地址栏输入:http://localhost:8888/oauth/authorize?response_type=code&client_id=client&redirect_uri=https://www.racecoder.com回车。response_type为code表示获取code,client_id为刚刚在代码中设置的client,redirect_uri表示服务器生成code后会重定向到此地址并把code拼在uri后,这个uri其实不存在都无所谓的,反正你能拿到code就行。
那这里由于设置httpbasic方式的验证,要求我们先输入用户名和密码,和QQ快捷登陆的过程类似,这里输入的是上面设置的root和123456,那输入之后就看到一个默认授权页面了
选择Approve授权后就会跳转到刚刚设置的uri并带上code,这个code使用一次后就会失效,所以获取到token后需要保存好token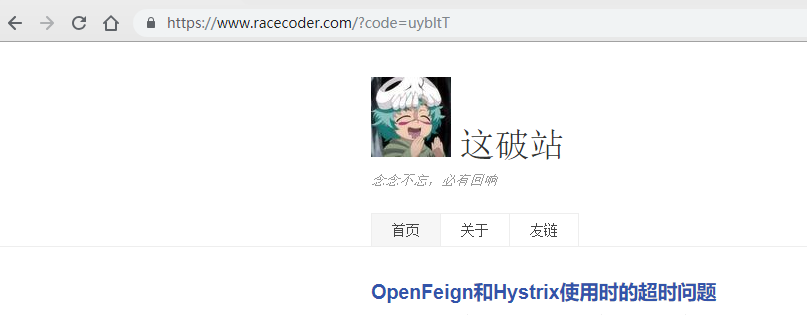
这里就允许授权,并拿到了code了,然后去换token
[root@raspberrypi ~]# curl -X POST -H "Authorization: Basic Y2xpZW50OnNlY3JldA==" -H "Content-Type: application/x-www-form-urlencoded" -d "grant_type=authorization_code&code=uybltT&redirect_uri=https://www.racecoder.com" http://192.168.1.8:8888/oauth/token
{"access_token":"2b1d5a71-fbab-491c-9e26-3e83a04dd237","token_type":"bearer","refresh_token":"68c7bc38-9c32-4854-9cde-11cea860db04","expires_in":119,"scope":"user_info"}
[root@raspberrypi ~]#
这样就获取到了access_token和refresh_token。然后就可以使用这个token请求资源了
$ curl -X GET -H "Authorization: Bearer 2b1d5a71-fbab-491c-9e26-3e83a04dd237" -H "Content-Type: application/x-www-form-urlencoded" http://192.168.1.8:8888/user/test?str=abc
使用postman测时一直都是这样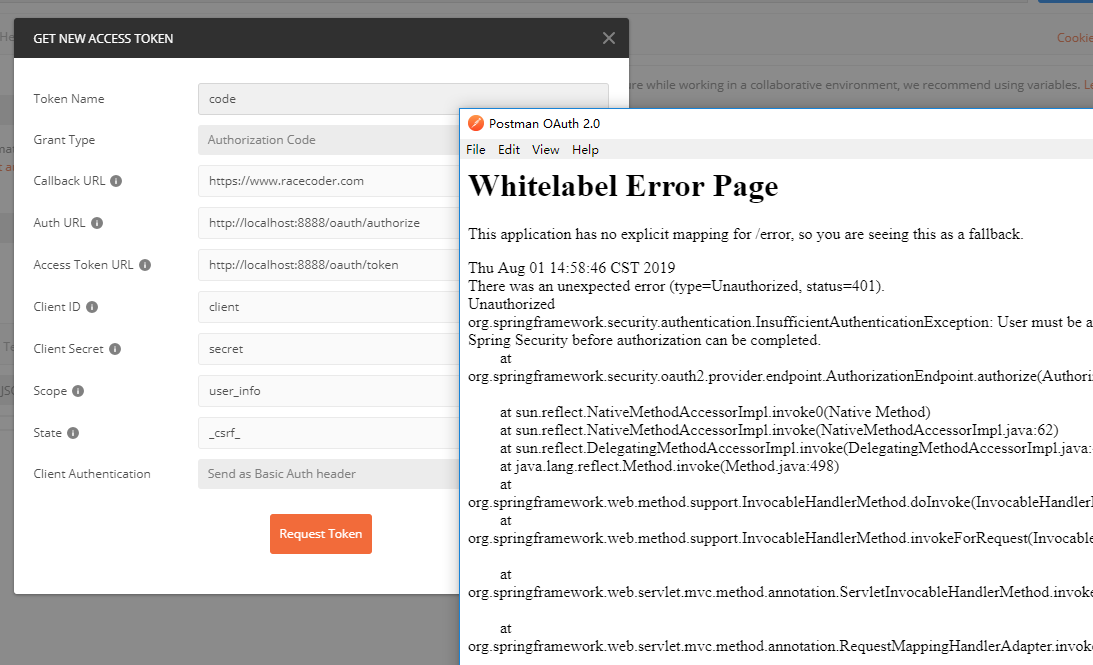
搞得我都要怀疑人生了,猜测是因为httpbasic方式的用户名密码输入,postman不支持这么做,所以授权失败。不过之前折腾的时候有一两次使用formLogin成功了,但是代码被改乱了,只有一个抓包记录。postman使用formLogin是可以授权的,但是Client Authentication要选择Send client crendentials in body
否则就是Bad client credentials异常,通过fiddler抓下包看下请求参数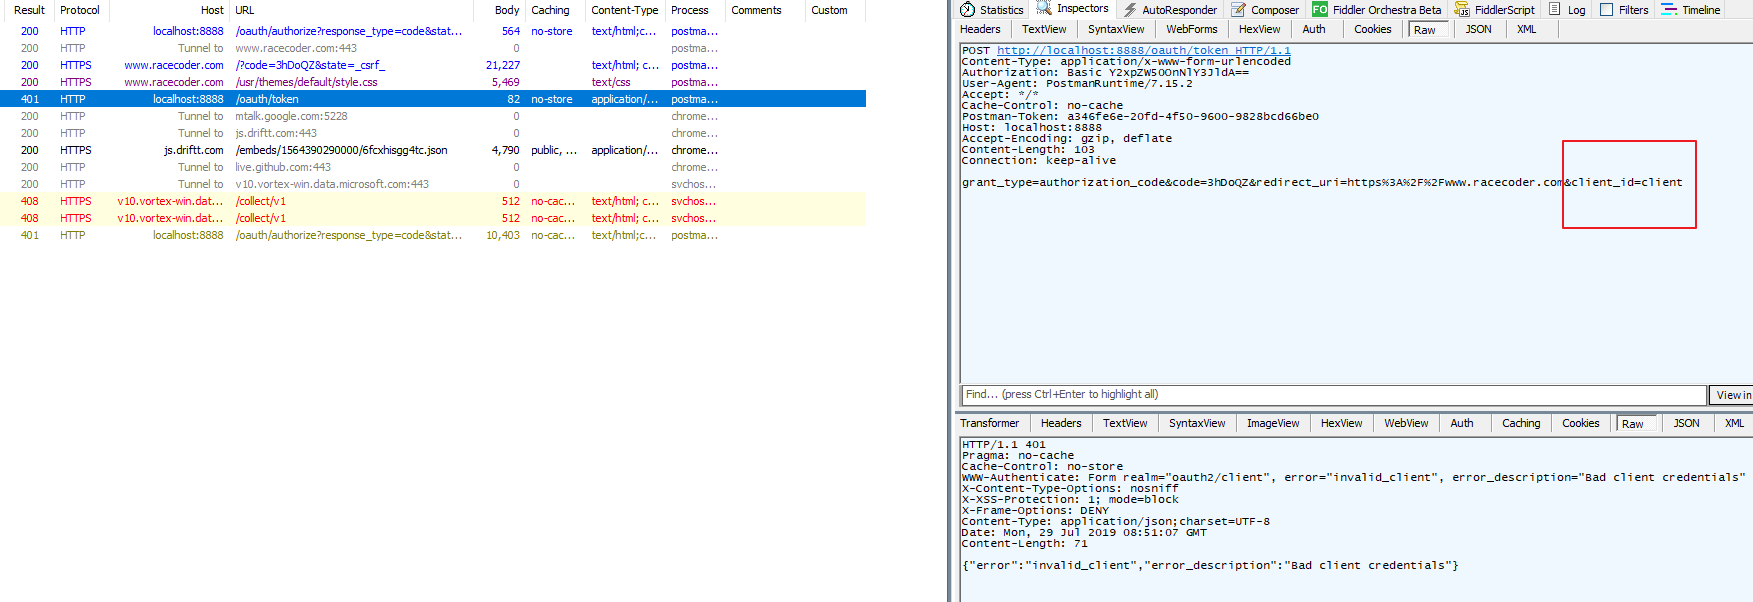
比curl方式多了传了一个client_id,虽然请求头有Authorization字段,但是spring security貌似只要看到client_id就会当作secret也在url后面,就会尝试去获取,然后没获取到就校验失败了。虽然RFC标准规定body中可以传client_id作为标记,但是spring security对OAuth2的支持貌似还不是很完整。所以这里用postman的话要选择将client和secret都在body中传。参考:https://github.com/postmanlabs/postman-app-support/issues/2296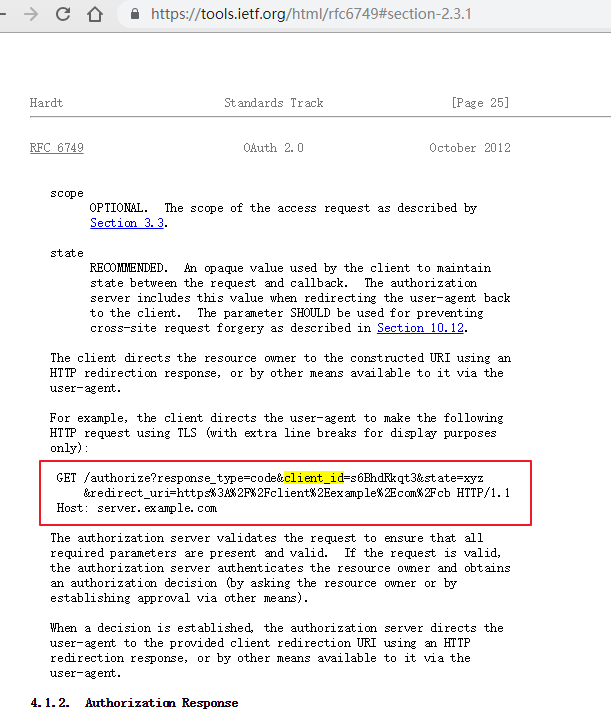
postman使用formLogin授权的代码其实就是httpBasic那里改成formLogin方式,不想再折腾了。那关于Authorization Code方式的授权就到这里吧,下面说说password方式的授权,有了code的铺垫这个就很简单了。
代码都不用改,postman改下授权模式就行了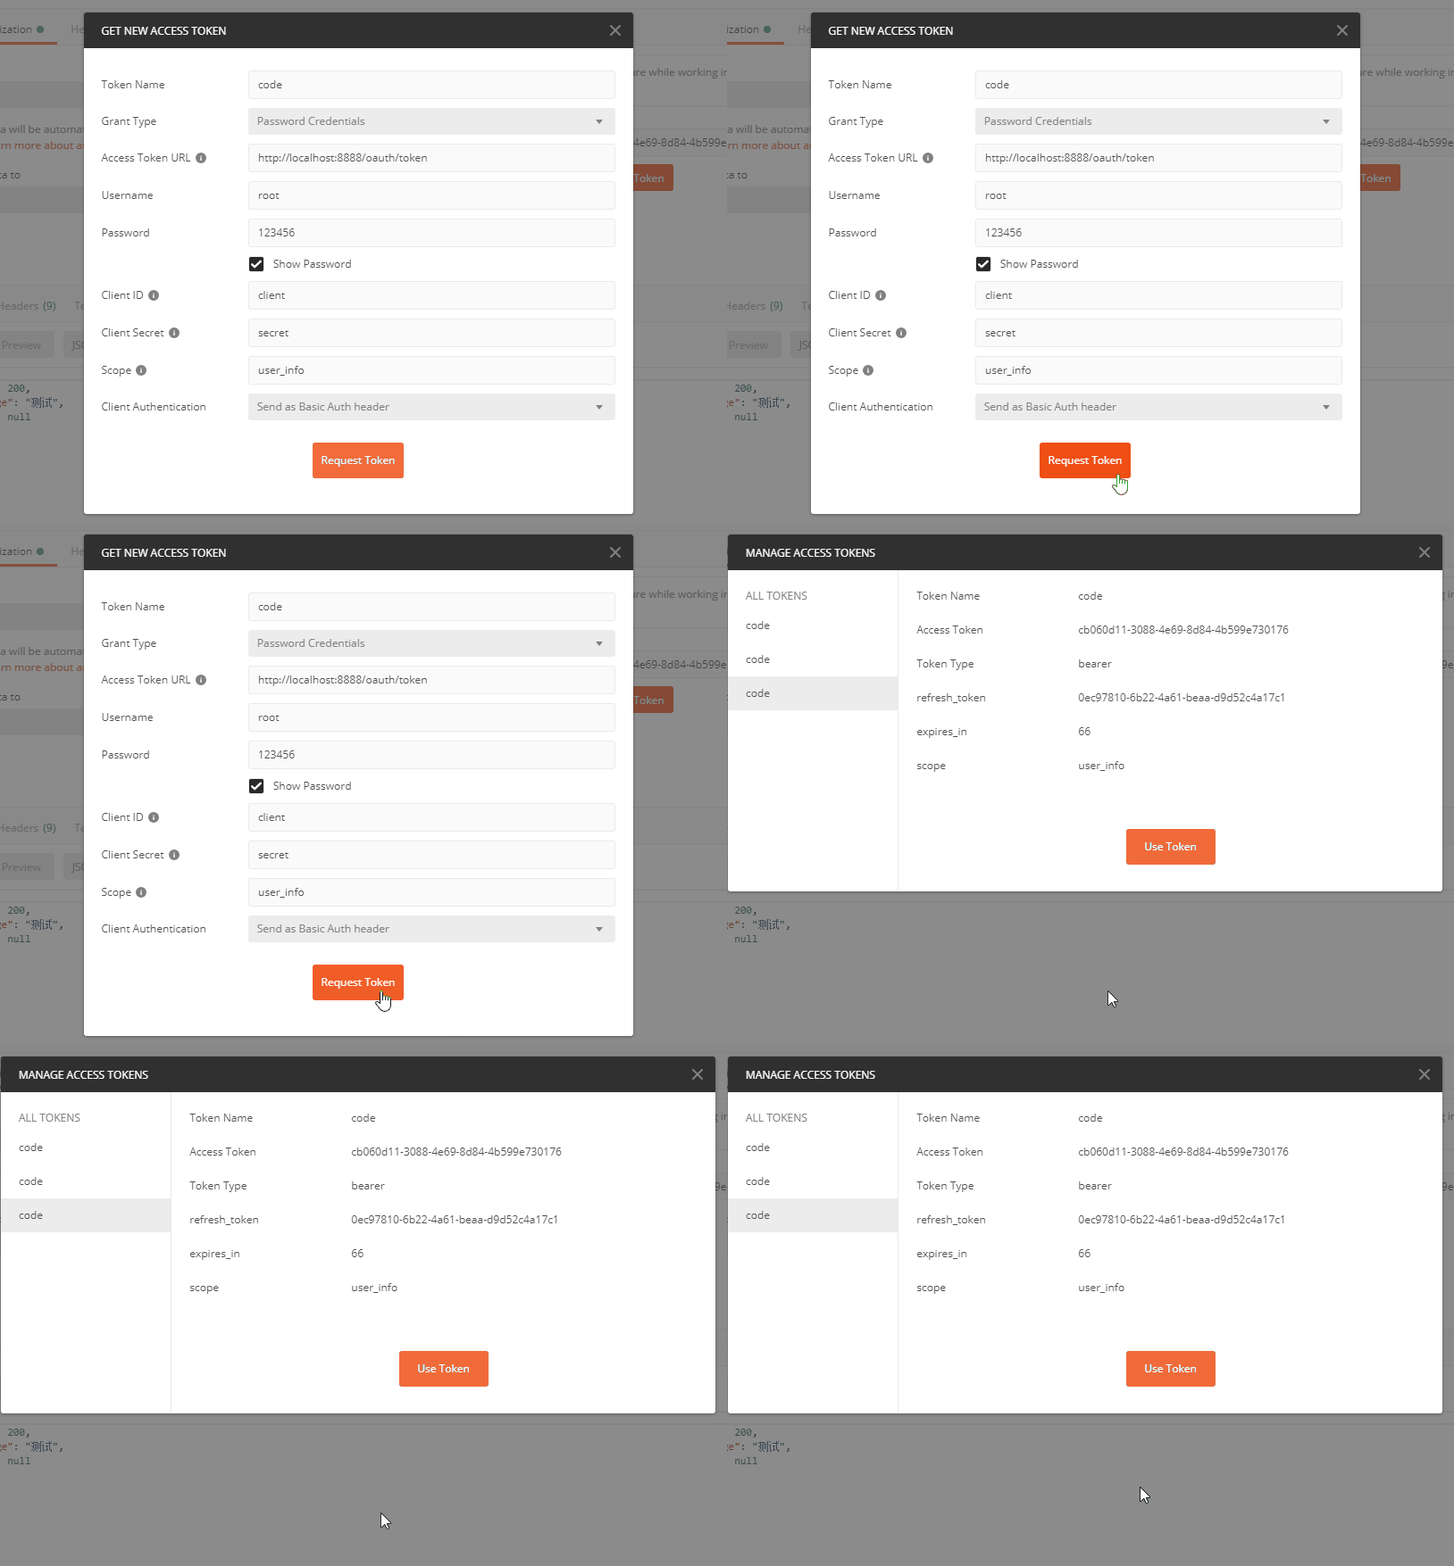
token拿到了就都一样了,不说了。下面就是JWT方式的token折腾过程了。
其实一开始是想着OAuth2的token使用JWT的格式的,虽然两者结合并不冲突,但是JWT本意就是为了分布式认证存在的,这和OAuth2完全不同。如果整合了这两个就多了一个校验JWT签名的步骤,因为这一步对于OAuth2来说完全多余,有token控制就足够了,但是如果想在token中放一些信息使用JWT是完全没问题的。但是,但是还有Redis这个东西,token存Redis中也完全没问题,可以缓存并集中管理token,但是JWT就和这个思想截然相反了,JWT设计就是为了服务端不存任何状态,只管校验JWT就行。因此越折腾越发现Redis和JWT是水火不容的东西,呃,也没那么夸张但是你懂我的意思吧,你确实可以强行将这两个结合起来,但是这么做只是徒增麻烦而已,没有任何作用。
那下面就看下OAuth2和JWT整合吧,不要Redis了。
先上代码,再慢慢说:
<build>
        <finalName>${project.name}</finalName>
        <resources>
            <resource>
                <directory>src/main/resources</directory>
                <filtering>true</filtering>
                <excludes>
                    <exclude>**/*.jks</exclude>
                </excludes>
            </resource>
            <!-- 不过滤jks文件,否则会导致文件不正常 -->
            <resource>
                <directory>src/main/resources</directory>
                <filtering>false</filtering>
                <includes>
                    <include>**/*.jks</include>
                </includes>
            </resource>
        </resources>
        <plugins>
            <plugin>
                <groupId>org.springframework.boot</groupId>
                <artifactId>spring-boot-maven-plugin</artifactId>
            </plugin>
        </plugins>
    </build>
yml加上jwt
security:
  oauth2:
    resource:
      jwt:
        key-store: classpath:keystore.jks
        key-store-password: DyRTTlwbjN6Qmd8k
        key-alias: jwt
        key-password: x5tIMkxIYmEJZB6v
        public-key: classpath:public.txt
授权服务器设置AuthorizationServerConfig需要增加jwtTokenConverter
@Override
public void configure(AuthorizationServerEndpointsConfigurer endpoints) throws Exception {
    // @formatter:off
    endpoints
        .allowedTokenEndpointRequestMethods(HttpMethod.GET, HttpMethod.POST)
        .tokenStore(tokenStore)
        .reuseRefreshTokens(false)
        .authenticationManager(authenticationManager)
        .accessTokenConverter(jwtAccessTokenConverter);
    // @formatter:on
}
Token设置,此处JWT使用了RSA非对称加密,而不是默认的HS256。HS256是对称加密,也就是加密和解密的key是一样的,而RSA则不一样,这在Auth Server和Resource Server之间不需要共享密钥。
@Configuration
public class TokenConfig {
    /*@Bean
    @Autowired
    public TokenStore tokenStore(RedisConnectionFactory redisConnectionFactory) {
        // Redis存 token一是性能比较好,二是自动过期的机制,符合token的特性
        return new RedisTokenStore(redisConnectionFactory);
    }*/

    @Bean
    @Autowired
    public TokenStore tokenStore(JwtAccessTokenConverter accessTokenConverter) {
        return new JwtTokenStore(accessTokenConverter);
    }

    @Bean
    @Qualifier("rsaProp")
    @Autowired
    public JwtAccessTokenConverter accessTokenConverter(RSAProp rsaProp) {
        JwtAccessTokenConverter converter = new JwtAccessTokenConverter();
        converter.setKeyPair(keyPair(rsaProp)); // 使用RSA
        converter.setVerifierKey(publicKey(rsaProp)); // RSA public key
        return converter;
    }

    /**
     * RSA key pair(a public key and a private key)
     */
    private KeyPair keyPair(RSAProp rsaProp) {
        Resource keyStore = rsaProp.getKeyStore();
        String keyStorePassword = rsaProp.getKeyStorePassword();
        KeyStoreKeyFactory keyStoreKeyFactory = new KeyStoreKeyFactory(keyStore, keyStorePassword.toCharArray());

        String keyAlias = rsaProp.getKeyAlias();
        String keyPassword = rsaProp.getKeyPassword();
        KeyPair keyPair = keyStoreKeyFactory.getKeyPair(keyAlias, keyPassword.toCharArray());
        return keyPair;
    }

    /**
     * RSA public key
     */
    private String publicKey(RSAProp rsaProp) {
        try (InputStream is = rsaProp.getPublicKey().getInputStream()) {
            return StreamUtils.copyToString(is, Charset.defaultCharset());
        } catch (IOException e) {
            throw new RuntimeException(e);
        }
    }
}
RSA的属性
@Configuration("rsaProp")
@EnableConfigurationProperties(RSAProp.class)
@ConfigurationProperties(prefix="security.oauth2.resource.jwt")
public class RSAProp {
    // Can be understood as a database of key pairs
    private Resource keyStore;
    // to access keyStore
    private String keyStorePassword;
    // particular key alias
    private String keyAlias;
    // to access particular key pair's private key
    private String keyPassword;
    // RSA public key to validate token
    private Resource publicKey;

    // getter & setter ...
}
还有jks文件和public key。那这里关于RSA的介绍就不说了,一般在Java中用的RSA文件格式是jks(最多的是Android)。所以这里用Java的keytool工具先生成jks文件,算法为RSA,keysize为2048,keystore类似于数据库,可以存多个key,storepass就是keysotre的密码,alias就是key的名字,类似于主键,而且只能通过alias找到这个key,每个key还有单独的密码即keypass:
$ keytool -genkey -keyalg RSA -keysize 2048 -alias jwt -keypass x5tIMkxIYmEJZB6v -keystore keystore.jks -storepass DyRTTlwbjN6Qmd8k运行后会让你输入一些store的信息,因为JWT用私钥加密后需要用公钥验证,而keystore中存了两个密钥,所以我们需要导出其中的公钥给资源服务器验证签名。
$ keytool -export -alias jwt -keystore keystore.jks -rfc -file public.txt需要你输入keystore的密码后就可以导出了公钥了,操作过程如下图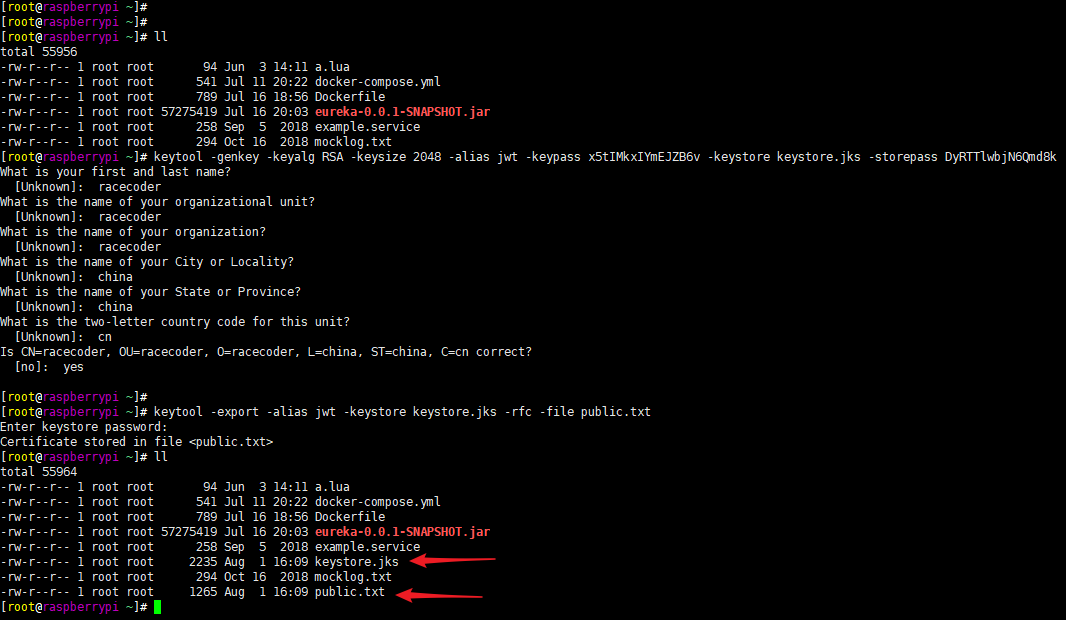
然后把这两个文件丢到项目的Resource下,现在的token是这样的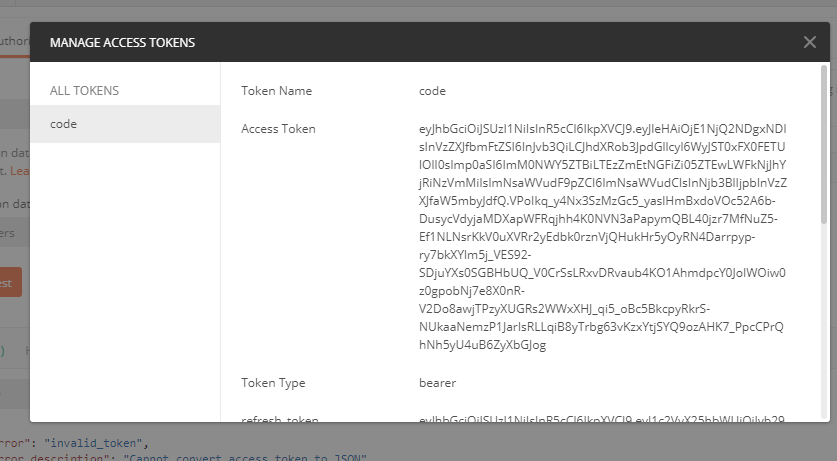
由于JWT第一部分存储了加密方式的信息,把设置RSA之前和之后的头部拿出来解码(BASE64是编码不是加密)
可以看到确实换掉了,那就这样吧。
过程中错误很多,常见的是
- Full authentication is required to access this resource
- InsufficientAuthenticationException
这俩一般是spring security的HttpSecurity配置有问题 - Bad client credentials
这个一般就是上面说到的postman会出现的问题,body中只包含了client_id
分享结束,感谢收看。
\>\> update 20200330,看到一个大佬对Session和JWT的解释非常清晰,强烈建议看一下,能够更容易理解JWT和Session应该在什么场景下使用:https://blog.by24.cn/archives/about-session.html
 这破站
这破站